In a previous entry I explained the importance of a daily schedule. Now I will show you how to build your own magnetic schedule, which will look like this:

Before I explain how to make a physical magnetic schedule (the most effective I’ve ever used), here are some rules that I would like to talk about:
- Make sure to put the important tasks first and the less important at the bottom of the schedule. Kids work better in the morning session than in the afternoon session.
- Include some breaks and interesting activities between the work sessions to capture the student’s interest in using the schedule.
- Schedules should be realistic and adapted to the child’s needs. In a special education classroom, different schedules are tailored to each child according to needs, unlike in a mainstream class where all students are following the same schedule. This is called accommodation and modification.
Types of schedules
- The most common type of schedules is a schedule that is typed or written on paper. These kinds of schedules are not very appealing to kids with autism. Why? Because they are not physical or tangible. But the worst thing about them is that they are not flexible and cannot be manipulated by the kids. However such schedules work well for high functioning kids.
- The other kind of schedule is a Velcro one, where the tasks can be moved around — very popular in schools.
- Next, is the schedule written by the teacher on the big classroom board. It is always good to have it especially if the teacher is going to use the board for other purposes, like writing the list of names of the students to mark a star next to their names every time they do a good job. In this case the children can notice the presence of the schedule.
- My favorite schedule is the magnetic board schedule. I made one and tried it out and it was a great success to the point that the student herself was more attentive than I was to change it independently and spontaneously every time a task was accomplished. It is very engaging. It is very simple to make and use, so let me show you how you can build one too.
Things you will need
How to make the magnetic schedule
- Get a white magnetic board as shown or a similar one of your choice
- Get flexible business cards magnets

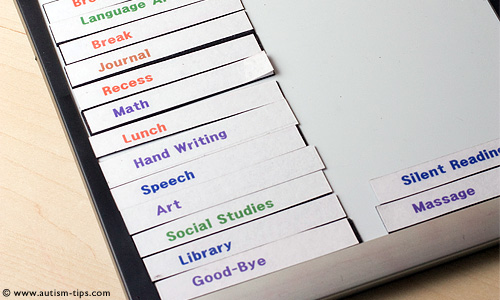
- Type (or write) all the schedule items you can think of (Silent Reading, Math, Language Arts, PE, Lunch, Recess, Music, Assembly, Art Project…) and try to make it colorful. Choose a reasonable size and font according to the child’s needs. You can download and print and example from this link. You can even add a picture or a symbol to make it more fun and adapted to lower functioning kids.
- Cut these items out and laminate them. Lamination can be done in many places. I go to Kinko’s because it is the closest. The letter size sheet costs $2.50. An alternative is to use adhesive tape instead of lamination.
- Cut out the business card magnet the same size as the item you’ve previously cut out using any regular pair of scissors

- Peel the self-adhesive magnet strip you’ve just cut out and stick the laminated schedule item on it. If the magnet is larger than the item you can trim it to fit, if it is smaller it doesn’t matter at all. It doesn’t have to be perfect.

- Take the magnetic board and place the magnetic items on it in the order you wish. Done! The schedule is ready!
Keep the unused items away (in a little bag or case) to be used in a different day or to change the schedule. Remember, only things the student is using should be kept on the desk for less distraction. Out of sight, out of mind.
A similar schedule can be kept at home for chores and things to do after school. This will ensure consistency between school and home besides a more organized and disciplined life.
nadia shanab